Cloud Native (3)
책 Cloud Native Spring in Action 학습 내용을 정리한 글입니다.
외부화 설정 관리
테스트 환경과 프로덕션 환경에서 설정을 다르게 적용해야 한다면 어떤 구조가 필요할까?
일반적으로 설정 데이터를 포함하는 번들로 패키징하고 플래그를 통해 원하는 설정 값을 가져온다. 하지만 이러한 방식은 설정 데이터를 업데이트 할 때마다 애플리케이션을 새로 빌드해야 하는 번거로움이 있다.
클라우드 네이티브 애플리케이션은 환경이 달라져도 동일한 애플리케이션 아티팩트를 유지할 수 있다.
배포 환경에 따라 달라질 수 있는 값은 모두 설정 데이터로 저장해야 한다. 또한 크리덴셜 값들을 외부에 노출시키지 않는 것도 중요하다.
Spring boot 속성 관리
스프링 부트는 여러 소스에서 속성을 자동으로 로드하고, 동일한 속성이 여러 소스에서 정의되면 우선순위 규칙에 따라 결정된다.
Environment 인터페이스를 사용해 속성 값에 접근할 수 있다. 그 외에도 @Value 애너테이션으로 속성을 주입하거나, @ConfigurationProperties 애너테이션으로 표시된 클래스나 레코드를 통해 속성에 접근 가능하다.
@Autowired
private Environment environment;

public String getServerPort() {
    return environment.getProperty("server.port");
}

// 또는

@Value("${server.port}")
private String serverPort;

public String getServerPort() {
    return serverPort;
}
사용자 지정 속성 정의
@SpringBootApplication
@ConfigurationPropertiesScan // 스프링 콘텍스트에서 설정 데이터 빈을 로드
public class CatalogServiceApplication {
    public static void main(String[] args) {
        SpringApplication.run(CatalogServiceApplication.class, args);
    }
}@Setter
@Getter
@ConfigurationProperties(prefix = "polar")
public class PolarProperties {
private String greeting;
}@RestController
public class HomeController {
private final PolarProperties polarProperties;
public HomeController(PolarProperties polarProperties) {
this.polarProperties = polarProperties;
}
@GetMapping("/")
public String getGreeting() {
return polarProperties.getGreeting();
}
}
프로파일로 기능 플래그 사용하기
배포, 테스트와 같은 다른 환경에서 다른 설정을 적용해야 할 때, 프로파일을 활용할 수 있다.
지정된 프로파일이 활성화된 경우에만 빈 그룹을 로드하는 방법으로 기능을 조건부로 로드할 수 있다.
이때, 아래와 같이 dev/prod 같은 배포 환경 기반 프로파일로 빈을 조건부 로드하는 것은 피해야 한다.
@Profile("dev")
@Bean
public DataSource devDataSource() {
    return new H2DataSource();
}
이는 새로운 환경 추가에 유연하지 못하고, 재사용이 어렵다. 대신 아래와 같이 기능에 의존하도록 하자.
@Profile("in-memory-db")  // 어떤 환경이든 이 기능이 필요할 때만 활성화
@Bean
public DataSource h2DataSource() {
    return new H2DataSource();
}
bootRun 작업을 실행할 때만(로컬 개발 환경) 빈 적용하기
@Component
@Profile("testdata")
public class BookDataLoader {

    private final BookRepository bookRepository;

    public BookDataLoader(BookRepository bookRepository) {
        this.bookRepository = bookRepository;
    }

    @EventListener(ApplicationReadyEvent.class)
    public void loadBookTestData() {
        var book1 = new Book("1234567891", "Northern Lights", "Lyra Silverstar", 9.90);
        var book2 = new Book("1234567892", "Polar Journey", "Iorek Polarson", 12.90);
        bookRepository.save(book1);
        bookRepository.save(book2);
    }

}bootRun {
systemProperties = [
'spring.profiles.active': 'testdata',
]
}스프링 속성의 우선순위
- CLI 인수로 정의
- JVM 속성으로 정의
- 환경 변수로 정의
- 속성 파일에 정의
- 기본값
중앙식 설정 관리
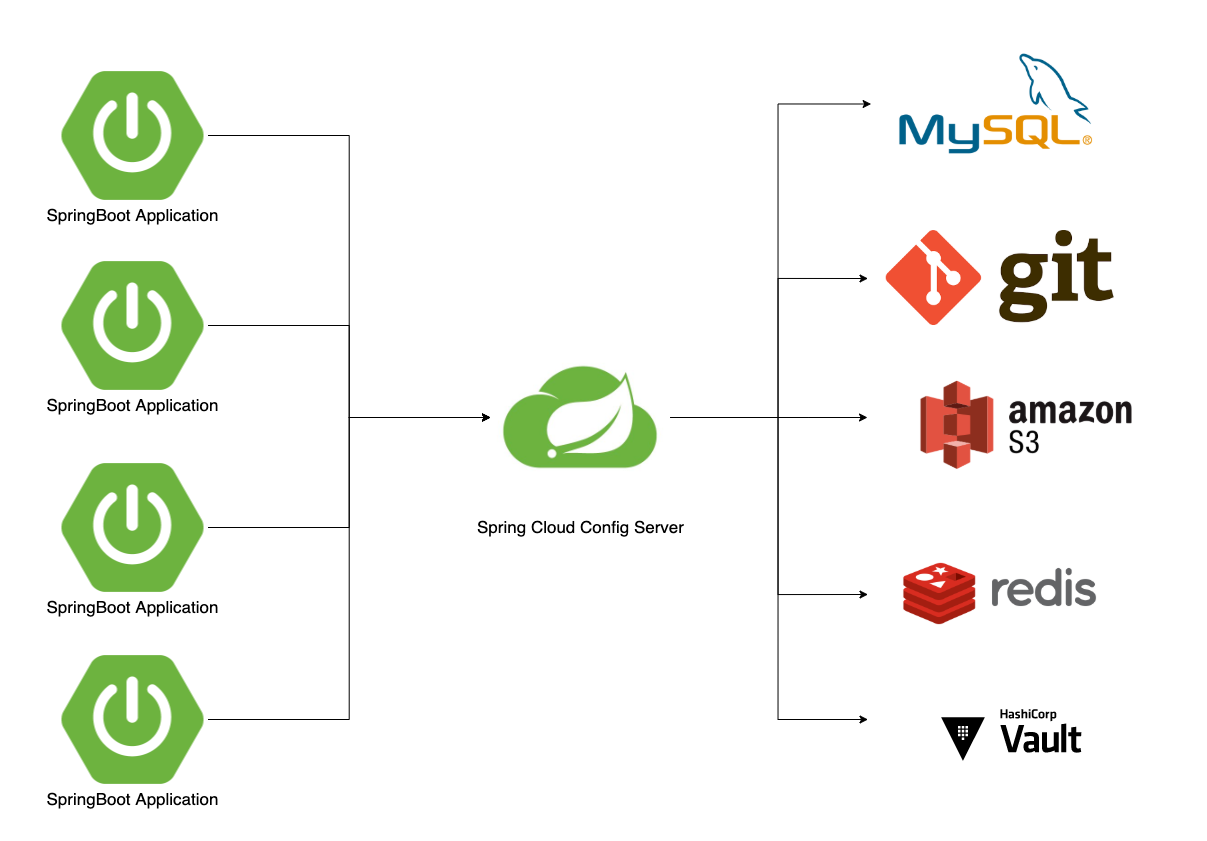
스프링 클라우드 컨피그 서버를 통해 설정 데이터를 중앙에서 관리하자. 중앙 집중식 설정은 다음 두 가지 주요 구성 요소를 가진다.
- 지속성, 버전 관리, 액세스 제어
- 데이터 저장소 기반으로 여러 애플리케이션에 데이터를 제공하는 서버 역할
설정 서버는 다양한 저장소에 접근하여 설정 정보를 제공해 줄 수 있다. 덜 민감한 정보는 깃 저장소에 저장하고 민감한 정보는 HashiCorp Vault에 저장하여 사용 가능하다.

출처: https://jaehun2841.github.io/2022/03/10/2022-03-11-spring-cloud-config/spring-cloud-config1.png
설정 서버 생성
github에서 설정 값을 관리하고 spring config 서버에서 설정 값을 요청해보자.
github repo는 다음과 같이 세팅한다.
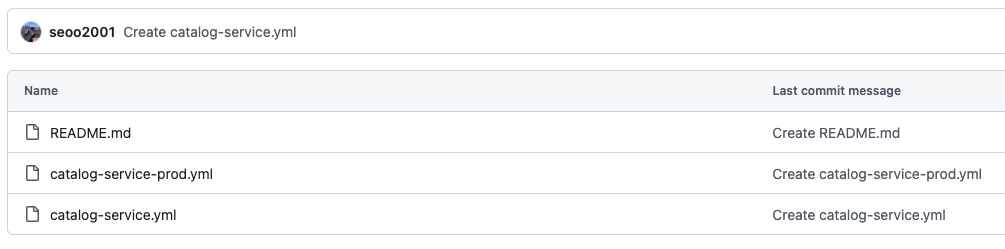
polar:
  greeting: "Welcome to the catalog from the config server"
dependency로 spring server를 추가하여 설정 프로젝트를 생성하고 @EnavleConfigServer를 추가하면 끝이다.
package com.polarbookshop.configserver;

import org.springframework.boot.SpringApplication;
import org.springframework.boot.autoconfigure.SpringBootApplication;
import org.springframework.cloud.config.server.EnableConfigServer;

@SpringBootApplication
@EnableConfigServer
public class ConfigServerApplication {

	public static void main(String[] args) {
		SpringApplication.run(ConfigServerApplication.class, args);
	}

}
application.yml 파일은 다음과 같이 설정하면 된다.
server:
  port: 8888
  tomcat:
    connection-timeout: 2s
    keep-alive-timeout: 15s
    threads:
      max: 50
      min-spare: 5

spring:
  application:
    name: config-service
  cloud:
    config:
      server:
        git:
          uri: https://github.com/seoo2001/spring-config
          default-label: main
          timeout: 5
          clone-on-start: true
          force-pull: true
REST API를 통해 속성을 제공한다.

서비스 서버에서 설정 서버 값 가져오기
spring:
  application:
    name: catalog-service
  config:
    import: "optional:configserver:"
  cloud:
    config:
      uri: http://localhost:8888
      request-connect-timeout: 5000
      request-read-timeout: 5000
      fail-fast: false
      #  spring-retry으로 내결함성을 향상 시켜보자. 애플리케이션이 시작할 때, 일시적으로 설정 서버를 연결하지 못하면 재시도한다.
      retry:
        max-attempts: 6
        initial-interval: 1000
        max-interval: 2000
        multiplier: 1.1
# build
./gradlew bootJar
# default config
java -jar build/libs/catalog-service-0.0.1-SNAPSHOT.jar
# prod config
java -jar build/libs/catalog-service-0.0.1-SNAPSHOT.jar --spring.profiles.active=prodRefresh
서버가 실행 중인 상태에서 github에 설정 값을 변경했을 때, 설정을 새로고침해줘야 한다. 이는 spring-boot-starter-actuator 의존성을 추가하면 된다.
새로고침 이벤트 트리거 엔드포인트 설정
management:
  endpoints:
    web:
      exposure:
        include: refresh
# 기존 설정 응답
curl -X GET localhost:9001/
# 새로고침된 설정 응답
culr -X POST localhost:9001/actuator/refresh
curl -X GET localhost:9001/